Showing posts with label Taiwan. Show all posts

Wednesday, October 27, 2021

Introducing my Etsy Shop: Valerie Storey Designs


At last! I'm so happy to announce the opening 

of my Etsy Shop: 

Valerie Storey Designs

"Inspired by the past, created for today."

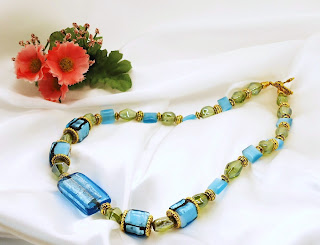
Earrings, bracelets, necklaces and pendants -- I have a brand! Everything is handmade by me, one-of-a-kind, never to be repeated and all with free USA shipping. 

Here's a small selection from the sixteen items I'm currently listing:


Although quite a few of the individual beads I've used were purchased right here in Albuquerque, many of them are from all over the world, collected during my travels to places such as Taiwan, Portugal, and Spain. I'm always looking for distinctive, unusual beads whenever possible, and often these are only available in very small quantities, guaranteeing that whatever I make from them will be one-time-only pieces.

Similar to the way I write and paint, my approach to beading depends a lot on the magic of randomness. I start with a handful of color (oh, how I love color!) and let the beads find their own way into a design often inspired by my many years spent visiting museums and galleries. Art history has always had a big influence in everything I do, inspiring my novels such as Overtaken and The Great Scarab Scam, but it's still a huge surprise to me to see how a piece will turn out: Egyptian, Etruscan Revival, mid-century modern: every bead tells a story!

One of the most surprising things to have come out of all this is my new appreciation for photography. Etsy requires a wide variety of product shots, and I have to admit the process was difficult for me to learn--I almost gave up at one point I found it so hard. But after several days of trial and error, I think I'm on the right track to figuring it all out: light boxes, satin drapery, as much daylight as possible . . . confusing at first, but like all creative endeavors, definitely worth pursuing.

Anyway, I hope you like my efforts and that you can visit my shop in time for the holidays! Over the coming weeks I'll be listing new items, so please stay tuned.

Tip of the Day: While I will always consider myself first and foremost a writer, art, beading, and working with hand-built pottery has enriched my life beyond measure. I can't imagine a day going by without at least a few minutes sketching or working on a new design for a bracelet or pair of earrings. The strongest advantage of having these varied interests is that they really do feed each other, especially when I'm stuck or hit some kind of road-block. Going back and forth between, say, a difficult scene in a particular chapter, to figuring out if blue beads look better with gold or silver findings, keeps my imagination active and open to receive the answers I need. Better than working solely on one project until you reach potential burn-out, always try to have another creative outlet ready and waiting. You'll be glad you did! 

UPDATE: Please note my shop has now moved to Valeriestorey.com

Tuesday, July 2, 2019

Adventures in Metal Clay

First foray into metal clay!

I've just returned (recovered?) from a 2-day class working with metal clay. Never in my life would I have thought making little metal bits and pieces could be a) so messy, b) so labor intensive, and c) so totally addictive. I can't wait to make more!
 

I apologize for the quality of these terrible photos. I'm not a photographer and I snapped them very quickly in my studio without a light box or any other professional set-up. No matter what I did I couldn't capture the rich luster of the pieces (the largest is about 2" high) which in real life have a much stronger sheen and color than shown here, thanks to several hours of polishing with a small hand-held rotary tool.
 

Copper pendants for beading.

Prior to taking the class, the only clay I ever worked with was just your typical ceramic-type clay: stoneware, porcelain, and terra cotta. The first time I ever heard of metal clay was through Twitter. I asked a Scottish jewelry maker how she crafted the quite lovely pieces she displayed on her profile page and she replied that she used silver clay. I was dumbfounded--I'd never heard of such a thing. When I further investigated the subject, I discovered there were all kinds of metal clays including steel, copper, and bronze which were the materials we used in the workshop.

My goals for creating the pieces were two-fold: first, I wanted to learn to make pendants for my bead work, and second, I wanted to create items for pottery inlay. I first thought of doing this when I brought home some antique coins from Taiwan several years ago and made a series of Asian-inspired pots using the coins for decoration. I was pleased with the way the pots turned out, but as I was tying the coins to the pots with leather and raffia I kept thinking it would be far more original and fun to create my own metal work designs. Hence my need for a workshop.

Now that I've taken the class and gone through all the stages of "I'm never doing THAT again," to "Wow, I could spend the rest of my life doing this!" my next step is to buy a comprehensive how-to book and investigate starting out with silver clay, a much less-complicated medium than bronze and copper. With silver, you simply form a design, fire it with a butane torch for a few minutes, scrub off the residue with a soft-bristled wire brush and Bob's your uncle--pure silver jewelry. Steel, bronze, and copper on the other hand require a certain amount of clay preparation (we mixed our own using powdered metal and water), a somewhat lengthy kiln firing, and a lot of finishing work: sanding, filing, and polishing. Again and again.

Despite all the tedium, not to mention the rivers of olive oil required to keep the clay from sticking to any surfaces and tools while in the molding stage (on Day One I was covered in enough oil to qualify as a fritter), I was extremely happy with my initial results. Believe me, they look much better in person, and I was amazed at my patience in learning to use a Dremel rotary tool without harming myself or others. I am definitely going to continue with this medium, and in the meantime I have eight pieces of treasure to keep me occupied for months to come. A real win-win if you ask me!

Tip of the Day: The workshop I took was held in a private studio but offered through the University of New Mexico continuing education department. Taking a class in the middle of the work week was as good as going away to summer camp for a month. What have you always wanted to learn to do? I bet your local school or college has just the course to get you started. Sign up today!

Wednesday, April 3, 2019

Picture Book Check-in: Sketching The White Pony

Practice page from my White Pony sketchbook

This year I'm once again helping to organize the Enchantment Show here in Albuquerque, a local art and writing event presented by the New Mexico chapter of the Society of Children's Book Writers and Illustrators. Basically, the show turns the usual way of producing a children's picture- or story book on its head: instead of a writer submitting a story to a publishing house and then the house assigning an illustrator to produce the pictures, we invite illustrators to paint or draw to a theme (this year it's Serenity) and then assign writers to write the accompanying stories. It's an awful lot of fun for everyone involved, and my main job is to match the artists with their writing buddies and to make sure everything is ready for our show deadline of June 1.

What this has to do with today's post is that I've been inspired to take this same approach to my own work-in-progress picture book, The White Pony, a project that's been dear to my heart for, gosh, a couple of years now. My title and inspiration comes from a book of Chinese poetry I bought decades ago for the grand sum of 25 cents at a Friends of the Library sale in Carrollton, Georgia. Most of the poems are hundreds, if not thousands, of years old, and some of the best poetry I've ever read. When I took my first splash ink class with artist Ming Franz, the friend I traveled to Taiwan with, I immediately thought the work I created with her was perfect for illustrating fairy tales. And that lead me to think of The White Pony and how I could turn it into a children's picture book.

Ever since then I've been working hard to "play" with splash ink or splash color techniques and learning to draw horses. Some days I feel I will be learning to draw horses for the rest of my life, but that's also how I feel about all my artistic endeavors anyway. Which is how all this relates to the Enchantment Show.

For a long time I thought I had to write my story first, and it wasn't easy. I didn't know whether I wanted to just illustrate some of the poems, or write some complicated story about a princess who wanted a pony, or a boy who wanted to find a pony for a princess, or a pony that wanted to find a pony friend . . . and on and on and on until I was totally blocked. The one thing I did know is that I wanted to paint the pony and his environment, but I just didn't know what to do with him as far as a story went.

Several months ago I decided this wasn't getting me anywhere fast and that what I really needed to do was follow the example of the Enchantment Show: paint first, write later. I've never been happier with a creative decision. 

To experiment with ideas for my illustrations, I worked in a small Stillman and Birn sketchbook, plus used some larger sheets of multi-media paper to create thumbnails and to lay out color palettes for how I would like the finished book to look:
 

There will be goldfish!


 And even a pony eventually!


I do know the changing seasons are going to be part of the story too. Here we have Spring.

  And Winter . . .

Summer turning into Autumn!

My main method of starting the sketches was to simply lay down random watercolor washes throughout the sketchbook and then try to "see the pictures" in the washes. The technique is very loosely based on the Chinese splash ink tradition, and one that matches my way of writing based on random prompts, whether it's for my art journal or a full-blown novel.

My primary drawing supplies have included Akashiya Sai watercolor pens, Caran d'Ache Museum Aquarelle watercolor pencils, Kuretake watercolors including their "Starry Nights" set of gold-range watercolors (love, love, love), and sumi or Black Magic ink and dip pen.

Now that my sketchbook is filled though, I'm gearing up for Phase II: good paper! Final drafts! Let's paint those ponies for real! After that, well, hopefully I'll come up with an actual story. But for now, I'm letting the illustrations guide my imagination. As the saying goes, somewhere in all that manure there has to be a pony, right? Draw it and the stories will appear. Yes.

Tip of the Day: How can the concept of "pictures first, write later" help your own writing project: screenplay, poetry, memoir, or novel? Keep in mind that you certainly don't have to draw your own--just a handful of magazine cut-outs arranged into an evocative sequence are often more than enough to jump start a multitude of WIPs!

Thursday, August 17, 2017

Focusing on Picture Books


Playing with ideas in my sketchbook.
Watercolor and ink.


Now that Camp NaNoWriMo is finished, I've been focusing on "what's next?" I have plenty of choices, including: continue marketing my current novel, The Abyssal Plain; revise and edit my work-in-progress novel Ghazal; write some more short stories. They're all important, and I don't want to neglect any of them, but the one thing calling me the loudest is to illustrate the picture book I started writing in my "spare" time last year.

To get my head (and studio) together, I've narrowed down my art supplies to the materials I truly love. Items that no longer serve me have all gone to good homes at the many cultural and recreational centers around town. The list includes charcoal, acrylics, pastel pencils, and a dozen other dubious experiments that just aren't "me." It was vital that at one time or another I explored these many types of paints and pencils; if I hadn't, I would never have found my genuine voice, and how sorry I would have been to miss that opportunity!

But now I know what I like and what I don't, and for today's post I thought I would share the supplies I'm using for this current stage of my art journey, beginning with:

1. Sketchbooks! I could talk about sketchbooks forever, probably because they double so well as manuscript and other journals. I probably have too many going at once (seven, with one more waiting in the wings), but I can't resist the various bindings, sizes, and papers. Each one is endowed with its own special qualities that inspire different stylistic choices and subject matters. My favorite brands are: Strathmore, Stillman and Birn, Moleskine, and Bee Paper Products. 
  
2. Akashiya Watercolor Brush Pens. I discovered these gorgeous pens on the last day of my Taiwan trip a couple of years ago. At the time I only bought four colors: black, gray, green, and reddish-brown. When I got back home, I was so impressed with the strength of the colors that I had to find where I could buy a full set. It wasn't easy, but thank goodness for JetPens.com.  What I love best about these pens is the tips are actual nylon brushes with tons of spring and sensitivity and the color they release is downright juicy. I've read several reviews complaining about the lack of light-fastness, which so far hasn't been a problem for me. Admittedly these pens are not for creating wall or gallery art, but neither are many brands of watercolors unless you buy top-of-the-line professional grade paints. Despite this possible failing, I highly recommend these pens for sketchbook use as well as any finished art intended for printing, such as greeting cards, or book illustration.


3. Water brushes.


A paintbrush already filled with water: what could be better? I particularly like the way these brushes work with the Akashiya pens; I can lay down some color then diffuse it with a few brushstrokes to create a myriad of effects. Water brushes can also be used with traditional watercolors or water-soluble pencils, great for travel. My only warning is that if you're planning to take them on an airplane, I suggest you first separate the water barrel from the brush to avoid any air locks, otherwise you'll never get the pieces apart again. (Stated from sad personal experience.)

3. Ink.

Sumi ink is my go-to for anything inky involving a dip pen or brush. I love the sheen, the permanency when used with watercolors, and the slightly embossed feel of the ink when it dries. On the negative side, sumi ink can be very, very messy and difficult to use if you want a precise, architectural-style line (I usually don't), and it's entirely unsuitable for any travel or outdoor sketching. For these situations I prefer using Tikky Rotring or Le Pen Drawing pens which contain excellent and smooth waterproof ink. My other two choices, a Pentel Stylus pen, and a Pilot super-fine nib fountain pen are fantastic drawing instruments, but the ink isn't waterproof, meaning I have to either forego watercolor, use colored pencils, or draw the lines in later.

4. Dip Pens.


My first choice for drawing thick, organic lines is always a bamboo stick pen. The tips blunt a little faster than I'd like, but they're not expensive to replace. For a more delicate approach, any brand of metal dip pen is good--they all work! What I like about dip pens is their tendency to be unpredictable which suits my style and sense of adventure. I actually like the random ink splatter, broken line, or unexpected "happy accident" that can provide a new direction and fresh life to a piece.

5. Watercolors.


When I lived in Georgia I never used anything but tube watercolors that I would then squish out onto a palette that stayed wet for weeks. The same humidity that kept my paints in a big puddle also prevented anything I was painting to ever dry faster than in a day or two. As much as I loved watercolors, I often hated their slow-drying properties, and I didn't use them as much as I do here in Albuquerque. Now that I'm in the desert, however, I LOVE watercolors. Whatever I paint dries in minutes, a great boon for impatient painters such as myself, except now the trouble lies in the tubes: not only do they dry up, but the caps become irremovable in just a matter of weeks. The solution, and one I like, is to use pan watercolors. They start out dry and it only takes a squirt of water from a spray bottle to reactivate them in seconds. Kuretake is my preferred brand (they makes sets with more than the 12 colors I've shown in the green box above), but recently I've discovered these generic blue-tinned watercolors sold under a variety of labels from both Amazon and craft stores that have surprised me with their quality and color range.

6.  Synthetic Brushes. 


I'm a vegetarian, but I do wear leather shoes and carry leather handbags on occasion. It's the same with my paintbrushes. I have some lovely Chinese real-hair brushes, and one cost-the-earth sable brush, but my first choice will always be a good synthetic. In the past they had a questionable reputation, but the quality has improved so much over the years that I find them better and easier to use than real fur. Princeton is my brand of choice, and I think what I like best about them is the way they make painting feel like writing, something that comes the most naturally to me.

7, Graphite Pencils. Blackwing. I'll say no more. Just try these pencils.


8. Canson Watercolor Paper.


When I'm not using my sketchbooks, I like to have a good piece of paper for both practice and finished artwork. Canson paper is ridiculously inexpensive--and very good! The paper comes in several sizes and is excellent for more than just watercolor, e.g., oil pastels and graphite. A very economical choice for both fun and serious work.

9. Arches watercolor paper.


This paper is my absolute No. 1. And it is pricey. Like, truly expensive. And totally worth it. And yes, I have messed it up, had to throw it away, and start all over again. All part of the learning curve. Sigh.

10. Gelli Printing Plate.


My Gelli Printing Plate has been the most fun and helpful tool I've come across. I use it to make random backgrounds for my work: spread a little acrylic paint on the surface (I know I said I don't like painting with acrylics, but they're a must-have for the plate. Gelli recommends using the cheapest, runniest, bottled brands with a high water content for easy spreading.), make some random marks with a paintbrush or Q-tip or whatever's handy, place a piece of paper on the plate, run your hands over the paper, and there you go--instant picture!

Tip of the Day: The nicest part of working on a picture book is I now have a great excuse to read picture books. In my opinion, they are the most important books in existence. I would not be who I am today without Little Bear, Babar, and The Lonely Doll. Not only did I learn to read with picture books, they instilled a life-long love of art, a desire to travel, and a world of friends and wisdom that will always be with me. Next time you're at the library or bookstore, treat yourself to visiting the children's shelves. Whether it's a trip down memory lane or a way to discover the latest trends and titles, you'll be glad you went.

Monday, January 2, 2017

Happy 2017! Happy Goal-Setting!


Here we are: 2017 and ready to write, draw, paint, bead, dive into the mud and best of all: stay creative every day. It's become something of a tradition of mine to list and share my goals for the New Year here on my blog, and this year I hope to inspire many of you to do the same. Not only does listing my goals help me to achieve them, but my list also helps me to map out how to get there, especially when I use my journal to further discover my "goals within goals."

The main thing I've learned from this annual practice is to keep everything simple and centered on the goals I really want, rather than any tasks or chores I (often mistakenly) think I should, or have to do. 

So with that in mind, my goals for 2017 are to:
  1. Sell, or independently publish before the end of the year, my novel The Abyssal Plain. 2017 is the year!
  2. At the same time, I want to edit and have ready for 2018 publication my novel, Ghazal.
  3. When I'm not writing, I want to complete the illustrations for my poetry collection based on my 2015 trip to Taiwan (publication planned for either this, or next year). I hope to include at least twelve (maybe more) of these paintings depending on the cost of full-color printing.
  4. And when I'm not writing or painting, I plan to continue making pottery and jewelry, but this year there will be a twist: I'm making items themed to go with my existing fiction and non-fiction books. For instance, ceramic pencil cups and holders to fit with my how-to, The Essential Guide for New Writers, and/or necklaces and earrings my main character, Sara Elliott, might wear in Overtaken. It's a fun way to come up with fresh ideas for both beading and marketing, even writing, and I've already bought some new beads and charms to make the first necklace. (Hint: it includes a tiny bejeweled Eiffel Tower.)
  5. Read more non-fiction. A few days ago I finished reading the fourth book in the Elena Ferrante Neapolitan series: The Story of the Lost Child. I was so overwhelmed by the power of that particular story and the rest of the books in the series that I felt I needed a break from reading fiction; after all, what could compare? Consequently I found myself at a loss without a bedtime book until I realized I might prefer nonfiction for a change. I went to the library and on random impulse picked out a biography on Mao Zedong--a complete surprise to me. So far I'm finding the book very interesting, encouraging me to expand both my knowledge of world events as well as taking a chance on other books I might usually pass by.
To round out my goal list, I also have a word for the year: Poetry. It came into my head out of the blue, and at first I wondered if it simply related to my Taiwan poetry manuscript and art project. But soon after "hearing it" I realized it meant that I wanted to keep the year poetic, filled with metaphor and symbolism, and a personal dedication to using those metaphors in all I do, from journaling to cooking dinner. It's an interesting concept, and one I'm still exploring. I'll let you know what I find out as the year progresses.

In the meantime, I want to wish you all a very Happy and Exciting New Year--may all your dreams be poetic, strong, and achievable!

Tip of the Day: Goal-setting is a valuable practice no matter what time of year you choose to start, but to my mind there's nothing more positive and practical than listing your goals in January. To add extra sparkle and creativity, rather than just listing your goals on a sheet of scrap or binder paper, how about treating yourself to a new journal, some fancy and colorful pens, and a package of collage items? Create a vision board in your journal to go along with your written goals. And don't forget to share: leave a comment or two here at my blog to let us know what some of your plans are. Have a great year, everyone!

Thursday, September 8, 2016

September Sketches

Sunday at the Albuquerque Rail Yards Market.
Kuretake Watercolor, Sakura Micron Pen

How has your summer been? For me it went a little too fast. Thankfully here in Albuquerque it's still sunny and warm, but there is definitely a tinge of autumn in the air. Which means it's time to buckle down with a "back-to-school" attitude and get back to my main WIP, Ghazal. I also want to get back into a dedicated sketching schedule that fits in with all my other projects.

Two things that are currently helping me get there are my writer's group summer art journal project and my outings with Urban Sketchers. Starting with my writer's group, because we've been meeting at the Albuquerque Museum we've been able to stay inspired by all the amazing art exhibited throughout the halls and galleries. Several weeks ago we had the idea to set out individually to find a painting or installation that could be the basis of some of our art journal pages. 

For me it was coming across an entire room devoted to the travel sketches of New Mexico-based architect, Antoine Predock. The extensive collection ended with an intricate proposal for a southern branch of the Palace Museum in Taiwan (unfortunately never realized), but I was so taken with the loose and easy style that led up to this final, intricate fantasy that I had to go visit the exhibition three more times over the next month. Predock's example and implied advice to scribble, go for color blocks and bold lines, and to follow what you feel about a place and its landmarks, rather than what you're "supposed to see" was exactly what I've been trying to achieve on my own for the last couple of years.

I kept all of that in mind last Sunday when I went with Urban Sketchers to the Albuquerque Rail Yards Market for two hours of morning sketching:

Albuquerque Rail Yards--abandoned but not forgotten!
Kuretake Watercolor and Sakura Micron Pen

The more I go out with the group the better I'm becoming at relaxing and losing my self-consciousness. I care more about the experience than the results, and consequently I'm drawing more than I ever have before. I love it!

Kuretake Watercolor, Fine-line Sharpie,
Akashiya Sai Watercolor Brush Pens

I then wondered how this approach could work with writing and I found it fit perfectly. For instance:
  • Go BOLD. Don't hold back; don't edit, mince your words, or fear critique and censure. Let go and let the words flow. 
  • Similar to a "gesture drawing," capturing the essence of a subject rather than the details, try gesture writing. First thoughts, first attempts, first drafts contain a lot of energy--energy that can transform your voice and writing into something only you could write. 
  • Write hundreds and hundreds of pages. I was impressed at how many sketches Predock had made, many of them simply a few lines in the center of the page, but each was so strong and effective. His examples reminded me to not skimp on materials, ideas, or any step that will express where I completely want to go.
Good ideas for some good writing time! Enjoy the season.
Tip of the Day: Thinking of editing your work? Whatever you do, please don't kill the sketch. Whether you're sketching towards creating a more polished painting, or freewriting dozens of vignettes and character studies for your novel, screenplay, or short story collection, don't go crazy with the polishing. Yes, weed out awkward phrases, lines, and repetitions, but stay true to what made you fall in love with your ideas in the first place. Stay loose.

Monday, June 6, 2016

Poem Sketching

From my weekend sketchbook: Pentel Stylo pen, Sumi ink, and watercolor.
I've been studying Chinese painting techniques, especially trees--
very meditative and just right for poetry!

How did it get to be June? And how have I managed to skip out on blogging for so many weeks? It seems like the A-Z challenge was only a few days ago . . . 

May was a hectic month: Someone drove into my new car (all fixed now, yay!), I wrote at least ten versions of a new query letter and synopsis of The Abyssal Plain (finally settling on one I liked, thank goodness), and my day job was intense--I went to the post office so often it's a wonder they didn't offer me a cot so I could just stay the night.

So in between driving here, there, and everywhere and buying postage, I started writing poetry, and then I started sketching poetry illustrations, and before I knew it, I was living on another planet--a secret creative place that shut out the whole world. I didn't Tweet, I didn't email (sorry, email friends), I didn't blog, I just zoned out and concentrated on doing what I wanted to do: write and draw. 

The poems, as well as the drawings, are based on my trip to Taiwan last year. Ever since I got home I've been trying to duplicate my feelings and experiences through my artwork, but there always seemed to be something missing. Now I know it was the words to go with my pictures. While I was still searching for those missing pieces, I knew I didn't want to write some sort of travelogue (I did enough of that in my Taiwan Travel Diary blog posts), and I certainly didn't want to start a new novel or short story collection. But I wanted to express myself in some strong and meaningful way, and poetry seemed to be the perfect vehicle.

I try to write at least one poem a day, basing it on various aspects of my journey: from riding the bus, to savoring tea and cake while thinking about monkeys in a museum tea shop. To get the ball rolling, I use a brainstorming technique I learned in Writing From the Inside Out by Sandford Lyne. Before I start writing, I take a piece of paper and head up two columns: one titled "Inner" and the other "Outer." "Inner" is for everything that involves feeling, e.g., what were my thoughts, emotions, even my state of health? "Outer" is for everything that was happening around me, including the weather as well as the people, places, and details of what I observed. Once I have all my memories and notes in place, I weave them together into a poetry draft, seeking connections and making leaps into new directions for more writing. It's a helpful and enjoyable process, and sometimes it almost seems as if the poems write themselves.

The most exciting part of this new work, however, is that I now have a good use for my paintings of Taiwan, as well as a reason to continue painting them: illustration! Best of all, I can use the same pen to draw and write with, LOL!

Old tree trunk: Pentel Stylo pen, sumi ink, 
and Japanese watercolor.

Tip of the Day: You don't have to be a published poet or MFA candidate to write poetry. All you need to be is someone in love with words and the chance to play with language. The next time you sit down to journal or freewrite, try putting your feelings into a poem. It doesn't have to rhyme or have verses, or even have proper line breaks--it just needs to be you experimenting on the page with a fresh approach. If you need some inspiration, read a few published poets first and then try the "Inner and Outer" technique to organize your thoughts and feelings.